Welcome to
On Feet Nation
Members
-
rimeton454 Online
-
Ab12 Online
-
sorifislam Online
-
Prajakta Online
-
sarika Online
-
Dorothygabler Online
Blog Posts
Bonus veren siteler
Posted by QKSEO on April 16, 2024 at 4:59am 0 Comments 0 Likes
Top Content
How To Replace Headphone Jack – The Correct Easy Way [SOLVED]
How To Replace Headphone JackHow to Replace Headphone Jack? Normally headphones are divided into two categories mono headphones and stereo headphones, normally most headphones within the market are stereo ones that include mobile telephones, play station, iPods or any multimedia gamers motive the ones are serving common customers like yourselves that inclined to experience being attentive to extremely good stereo track to your headphones. On the opposite hand, there are sure cases where mono headphones are getting used on certain devices or for studio functions. Table of Contents How to replace headphone jack?
Before intending with the headphone plug alternative
Headphone Jack Parts
How to replace headphone jack Replacement Steps
Add — on Note
Conclusion
How to replace headphone jack?
To update a headphone plug you need the subsequent, so that you may test their charges at Amazon:
New aux jack. Wirecutter or Flush Cutter. Wire stripper.
Soldering Iron Tool.
Lighter.
Since this is the clean manner to update a headphone plug, allow’s guide you via the process under.
Before intending with the headphone plug substitute Before intending with the replacement of your broken headphone jack you need to be acquainted with the plug parts as this could involve connecting the proper components with the proper cables so your headphone works perfectly with out problems. Also to protect your headphone/multimedia device of being defected in any hazard.
Headphone Jack Parts So on this regard, I want you to take into account that if you have a normal commonly used stereo headphone you need to see that the jack has black stripes dividing the jack into 3 metallic portions (subsequently mono headphones can have handiest 1 black stripe “steel ring”).
Referring to the beneath photo you can see the distinction between mono and stereo headphone plugs.
how to fix headphone jack NOTE: I will preserve to expose you a way to address the stereo headphone as that is the maximum common case consequently the equal applies for mono headphone plugs. Stereo Headphone plug consists of 3 parts that are:
Ground (Always represent the lengthy stripe of the jack) Right (continually represent the center stripe of the jack) Left (constantly represent the end strip of the jack) Those parts correspond to three cables that are connected to the headphone speaker and that is what we gonna paintings on to update the headphone jack repair after doing away with the broken one.
After studying about how to update headphone jack might also you want to read why are my headphones so quiet
How to update headphone jack Replacement Steps Step 1 — Cutting the antique headphone jack repair (this ought to take round 2 — five minutes)
fix headphone jack First, using the cord cutter cut the cable close to the plug but depart as a minimum 2 cm cable to the plug reason we can want this next. By using the cord stripper cast off around 2 to a few cm from the headphone cable give up.
! CAUTION: Do not use the scissors in case you feel you can’t do it otherwise you don’t have the intestine for it, I use it every now and then due to the fact headphone jack substitute I even have the enjoy and I did it earlier than so in case you fail to do it properly you can reduce the cables inside even with out seeing a clear-cut. So higher to take this into consideration. Remove coating from every smaller person cable Green, Red, and Brown cable the usage of the identical stated method above or via using a lighter by using placing a flame of hearth on every cable stop for a 2nd to remove the coloured plastic shield.
Cables coloration codes
The Green cable must connect with the Left speaker. Red connects to the Right speaker. Headphone jack restore.
NOTE: If you sliced the cable and found different hues at the three cables, you may use AVO meter (multimeter) to check which cable connects to which metal ring of the jack but if you do now not have a multimeter tool there need to be as a minimum a unmarried Brown or Black cable which represents the ground (or commonplace cable) so solving the opposite cables (for the Right and Left speakers) will now not reason an difficulty because you restoration the floor cable to the proper jack terminal as a way to repair headphone jack.
Step 2 — Connect the cables to the new plug you have got (This ought to take no greater than 1–2 mins)
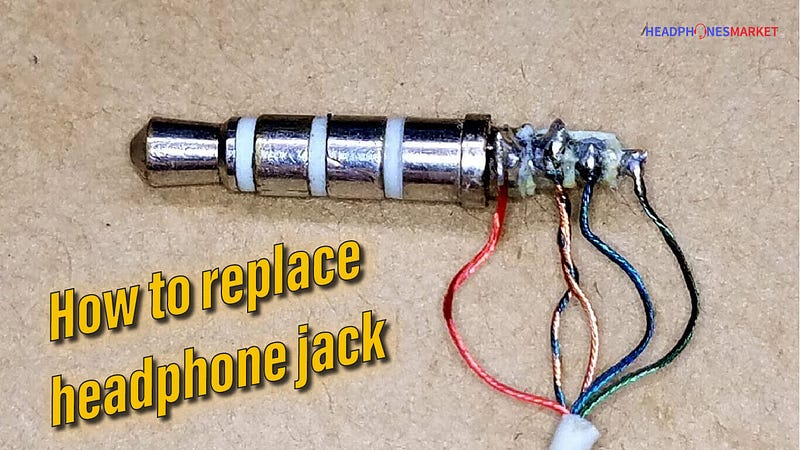
Open the new headphone plug you have via screwing it, then placed the second one piece of the brand new plug into the cables you sliced (as shown within the underneath photo The Brown cable have to be linked to the huge terminal of the brand new jack plug, really slide the Brown cable into the massive terminal hollow as proven in the photograph and wrap it around the terminal for few times tightly.
Solder the twisted Brown cable on its place with the plug terminal and make sure that it is fixed properly and stable. (Check the beneath video and notice a way to repair headphone jack cable “ground” to the jack pole in )
NOTE: The Same concept of the above image can be used at the unique damaged jack to decide which cable related to which jack metallic ring by using touching the extra 2 cm cable via one of the multimeters cable pole (as proven within the above photo) and the alternative side touching the other multimeter pole. Insert the Green cable into the left terminal hole (recall it left if you location the new jack frame as proven in the below image) and wrap it across the terminal for few instances tightly then solder it in its area with the plug terminal and be sure that it’s miles constant properly and solid. Repeat the equal last step with the Red cable by way of placing it into the right panel hole and wrap it across the terminal for few times tightly then solder it in its area with the brand new headphone plug terminal and ensure that it has soldered properly and stable.
! CAUTION: Remember that the three cables need to not touch every other otherwise a short circuit will arise when you insert the plug into the jack or at least it will now not paintings properly.
Add — on Note
You can do every other additional step to make your work perfect by using a Heat Shrink Sleeve by way of placing a quick piece of it internal each of the 3 colored cables, and after finalizing the soldering on the final stage honestly push those sleeves above all the 3 soldered factors individually (as proven inside the under image) then positioned some direct warmness on them by way of the use of a lighter for an instance till they shrink tightly on every of the cable/terminal connection.
By using the Heat Shrink Sleeves you’re protective the new headphone plug from being corrupted once more within the future and stopping any accidental brief circuit can also occur at any time due to each day utilization of the headphone.
Conclusion Often instances one earpiece of the earphones stops running or having noise and reducing off the sound, maximum in all likelihood and commonplace motives in the back of this problem due to the headphone plug. So replacing the headphone plug yourself at home can be an awful lot easier than you anticipate and because it doesn’t worth wasting some time searching out a technician to make it show up for you, it’s far better to resolve it out yourself inside minutes in an clean manner following how to restoration headphone jack educational article.
Views: 2
Comment
© 2024 Created by PH the vintage.
Powered by
![]()
You need to be a member of On Feet Nation to add comments!
Join On Feet Nation