Welcome to
On Feet Nation
Members
-
Alice Online
-
Anna Online
-
Poddar College Online
Blog Posts
siokuodc
Posted by Richard on September 23, 2024 at 12:07am 0 Comments 0 Likes
tunwgqkr
Posted by Alice on September 23, 2024 at 12:07am 0 Comments 0 Likes
lwhedspn
Posted by Anna on September 23, 2024 at 12:07am 0 Comments 0 Likes
Careers after BA in Economics
Posted by Poddar College on September 23, 2024 at 12:05am 0 Comments 0 Likes
To pursue Economics as a career, one must have the mental capacity to face the tremendous strain and hurdles that lie ahead given the dynamic nature of the economy, which can fluctuate at any time and for a variety of causes. Poddar International College, one of the best College in Jaipur provides best UG/PG in Commerce along with other courses.
After completing BA in Economics, graduates can explore plentiful opportunities in both the public and private sectors. Moreover, with the…
Top Content
7 Answers To The Most Frequently Asked Questions About Business Card Printing
Simple bindings for your hand-crafted books are simple to do. They provide a more elegant and longer-long lasting remedy than staples or binder clips.
You can use a variety of materials for the cover. The cover can be made from card stock, file folders, heavy-excess weight papers, fabric, vinyl, or natural leather. Match the binding materials to the content of your book to reinforce the theme and shield it. Be cautious about using wood since it contains chemicals that may degrade the http://query.nytimes.com/search/sitesearch/?action=click&conten... inside pages. Use it only for a short-term ornamental item. You may make a smooth cover by using your choice of materials without applying stiff cardboard backing. Make a hard cover by applying the material over cardboard lower to size. Cut two coordinating pieces of cardboard to type the front and back again cover. Make them 1/16 of an inch bigger in both height and width than the text web pages. There is no overhang in this binding.
Any type of cord or string can be used for the stitching including yarns, raffia, leather thongs, jute string, twine, gimp, soft wire, thin ribbons, and fine braids. They are some of the more unusual options for thread. On a traditional project you might use linen, embroidery, or carpet thread, strong nylon thread, or waxed dental floss.
In your initial book design, be sure to allow space on each page for the backbone. Spine depths will change with the number of webpages and the thickness of the paper. In most cases business card printing Passaic County enable ½" to ¾" of blank space on the side of the page which will be attached to the spine as well as the margin around the writing.
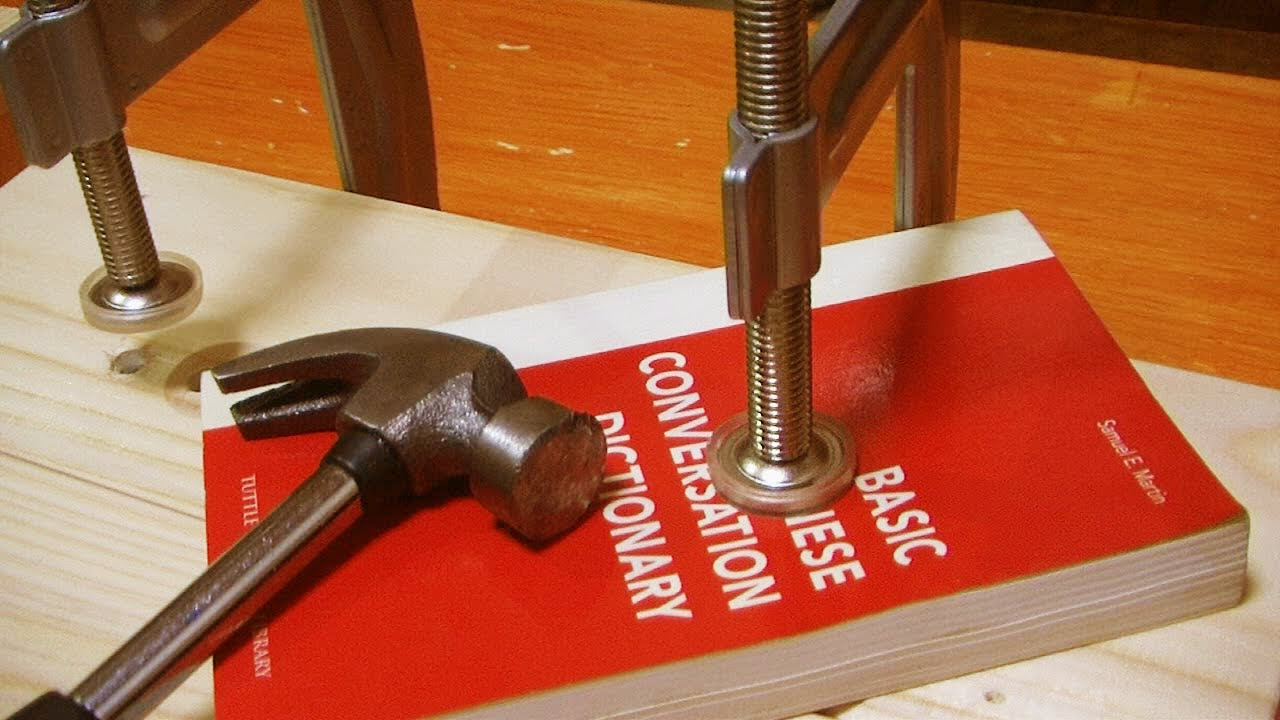
Equipment. You will require an awl or a little nail and hammer, cardboard for a difficult cover, material for the cover, cording or thread (eight occasions so long as the book's height), binder clips, a needle, pencil, ruler, phone publication or scrap hardwood to protect your work surface.
How to do it. These guidelines follow Japanese publication binding techniques to make a binding which will last.
Step one 1. Measure ½" from the spine of leading cover and use your ruler to draw a line from the very best to the bottom. At risk you have simply drawn, make a mark ½" down from the top and ½" up from the bottom. Divide the length between those two marks into thirds and mark two middle points. You ought to have four marks.
Step 2 2. Even up the web pages of the book and place them between the front and back addresses. Clamp with binder clips. Put on your protected function surface. If needed, weight down http://www.bbc.co.uk/search?q=Totowa New Jersey the web pages to maintain them from moving. Punch holes through the marks using the awl or a little nail and hammer. Do this in batches of 20 pages or less; in any other case pages and holes slip out of alignment. Once all web pages are punched, stack them with holes aligned on the left hand side.
Step 3 3. Thread the needle with the thread. Tie the ends collectively in a knot. You now have a continuing loop of thread, brochure printing near me the needle at one end, the knot at the other. Anchor the thread by opening the reserve about 20 web pages and pressing the needle through the lower middle hole. Draw the thread until the knot is snugly installed against the pages. Wrap the thread around the spine and drive the needle through the low https://en.search.wordpress.com/?src=organic&q=Totowa New Jersey middle hole again. Draw taut.
Step 4 4. Consider the thread across the top cover to the upper middle hole. Force the needle down during that hole, around the spine and back off through the same hole. Pull the thread tight after each hole.
Step 5. Consider the thread over the bottom level cover and come up through the very best hole. Go around the spine or more through the very best hole again.
Step http://paxtonwdqy291.lucialpiazzale.com/5-qualities-the-best-people-in-the-business-card-printing-new-jersey-industry-tend-to-have 6. Take the thread across the top of the cover so that it crosses the very best edge of the reserve (as opposed to the spine). Wrap the thread around this top edge and bring the thread up through the top hole.
Step 7. Consider the thread across the top cover and down through the upper middle hole.
Step 8. Consider the thread across the back cover or more through the low middle hole.
Step 9. Take the thread over the top cover and down through underneath hole. Wrap the thread around the spine. Take the thread down through the bottom hole again.
Step 10. Take the thread across the bottom cover so it crosses the bottom edge of the book. Wrap the thread for this bottom edge and bring the thread down through the bottom hole.
Step 11. Take the thread across the back cover to the starting hole. Bring the needle up through the starting hole. Tie off the thread firmly by slipping the needle beneath the two top threads coming out of the starting hole and back through the loop.
Step 12. Run the needle straight down through the starting hole and cut off the thread flush with the trunk of the book.
You can vary this basic binding through the use of different spacing of the holes and patterns of sewing. As a ornamental feature, you can sew a stick, ribbon, or beads in to the binding. Add the decoration along the spine if it's thick plenty of or on the front cover. Do remember to consider function first though. If the decoration will hinder reading the book, do not use it.
Views: 2
Comment
© 2024 Created by PH the vintage.
Powered by
![]()
You need to be a member of On Feet Nation to add comments!
Join On Feet Nation