Welcome to
On Feet Nation
Members
-
Dwayne Online
-
-
Blog Posts
Innovative Minimalism Pushing Boundaries in Home Design
Posted by jackharry on May 4, 2024 at 12:47am 0 Comments 0 Likes
In a global frequently characterized by excess, mess, and continuous activation, the concept of minimalism offers a stimulating alternative. Smart properties, using their clean lines, open areas, and intentional style choices, have gained acceptance in recent years for his or her ability to offer harmony, operation, and aesthetic appeal. This short article delves to the viewpoint behind smart properties, considers their important functions and benefits, and displays some striking examples of… Continue
Top Content
Expert Carpet Repair Techniques: Step-by-Step Repair Techniques
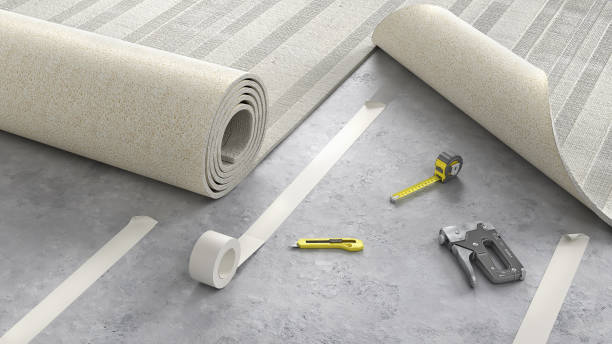
Carpet repair doesn't have to be difficult. With the right tools and techniques, you can confidently tackle common problems like ripped stains, stubborn stains, burn marks, loose carpet, and frayed edges. Here is a comprehensive guide to step-by-step repair techniques.
[size=22]A. Repairing torn or torn areas [/size]
Prepare the area: Use a utility knife to cut away any loose fibers around the torn or torn area. Thoroughly clean the area to remove dirt, debris, and loose fibers. Cut the patch: Measure the damaged area and cut a replacement patch from the corresponding carpet. Make sure the patch is slightly larger than the damaged area to ensure an accurate fit.
Apply adhesive: Use a putty knife or adhesive applicator to apply carpet adhesive to the back of the patch and the surrounding area. Press the patch firmly into place and blend seamlessly with the surrounding carpet fibers.
Attach the patch: Place a heavy object or weight on top of the patch to ensure it adheres properly. Once the glue is completely dry, remove the weights and trim any excess fibers to create a seamless finish.
[size=20]B. Remove stubborn stains
[/size]
Identify the stain: Determine the type of stain you're dealing with (food, drink, pet urine, etc.) and choose the appropriate cleaning solution.
Blot the stain: To avoid spreading the stain, use a clean, absorbent cloth to gently blot the stain from the outside edges to the center.
Apply a cleaning solution: Apply a small amount of carpet stain remover or cleaning solution to the stained area. Follow the product instructions and test in an inconspicuous area first to ensure compatibility with your carpet.
Wipe and rinse: Wipe with a clean cloth to remove cleaning solution and dirt residue. Rinse the affected area with water and pat dry with a clean towel.
Repeat as necessary: For stubborn stains, repeat the cleaning process as necessary until the stain is completely removed. Avoid scrubbing as this can damage the carpet fibers and spread the stain.
[size=20]C. Repairing burns and melted areas [/size]
Trim damaged fibers: Use a sharp utility knife to carefully remove any burnt or melted fibers around the burnt area. Be careful not to damage the surrounding carpet fibers.
Apply seam adhesive: Apply a small amount of seam adhesive to the back of the matching carpet scrap or patch. Press the patch firmly onto the burn area, making sure it matches the surrounding fibers. Blend the patch: Use a carpet seam roller to blend the edges of the patch with the surrounding carpet fibers. Apply light pressure to ensure a seamless transition and optimal adhesion.
Let Dry: Follow the manufacturer's instructions and allow the adhesive to dry completely before entering the repair area.
[size=20]D. Re-stretch loose carpet [/size]
Remove furniture: Remove furniture and obstructions from the room to make loose carpet easier to reach. Locate Loose Areas: Locate loose areas of the carpet and determine the direction of the carpet pile.
Use a knee kicker: Place the knee kicker a few inches from the edge of the carpet, making sure the teeth are facing the wall. Apply pressure to the kicker with your knees and stretch the carpet toward the wall.
Trim excess carpet: Once the carpet is stretched, use a carpet cutter or utility knife to trim the excess carpet along the baseboard.
Install with adhesive strips: Apply new adhesive strips along the extended edges of the carpet, making sure it is securely attached to the subfloor. Use the carpet toggle to press the carpet against the tack strip to secure it.
Replace the furniture: Once the carpet has been re-stretched and secured, it's time to replace the furniture and other items in the room.
[size=20]E. Repairing frayed edges
[/size]
Trim frayed edges: Trim any frayed or frayed ends of the carpet with sharp scissors or a utility knife. Cut along the seam line to create a nice straight edge. Apply seam tape: Apply double-sided carpet seam tape along the trimmed edge of the seam, making sure the seam is centered and aligned with the seam line.
Heat Activation: Use a hot glue iron or seam tool to activate the adhesive on the seam tape. Follow the manufacturer's instructions for temperature settings and application methods.
Press and Seal: Press the seams firmly, making sure the edges line up and the tape will stick well. Use a carpet seam roller to remove air bubbles and ensure a strong bond. Cool: Allow the seam to cool completely before walking or vacuuming the repair area.
By following these step-by-step repair techniques, you can effectively fix common carpet problems and restore your room to its former beauty. Whether you're repairing tears, removing stubborn stains, fixing burns, reupholstering loose carpet, or fixing frayed edges, proper technique and attention to detail are key to achieving a professional finish. Masu. The following sections explain each repair technique in detail and provide tips and tricks to help you tackle your carpet repair projects with confidence.
Views: 3
Comment
© 2024 Created by PH the vintage.
Powered by
![]()
You need to be a member of On Feet Nation to add comments!
Join On Feet Nation